How to Use the Tupelo Knife 
by Vic Kirkman
Basics Strokes with the Tupelo Knife
The standard cajun tupelo knife used here, (two handle styles), has a 68-72mm long, single bevel blade with a hardwood handle. The blade shape is a special design that puts the cutting power where it should be when sculpting tupelo.  You must NEVER  sharpen this knife on any stone. STROP ONLY and there is a special way to do that.  
See Sharpening Demo and follow the stropping instructions there to the letter in order to take the best care of your knife and keep the fine razor edge required for carving tupelo wood.  
Return to Beginner Basics
Click on Images to Enlarge
1. The dynamics of the BK-1 Tupelo design require it to be used in the following manner, to be most effective.  Notice the s-curve flow of the handle to blade shape.  In the forward stroke, the force is provided from the shoulder and triceps of the upper arm down through the forearm, wrist, palm of hand and through the handle of the knife to the curved cutting edge of the blade.  The length of the blade is used to its fullest potential when the entry moved longitudinally forward to the wood being shaved at a 45 degree angle to that direction.
2.  Here you can see the result of moving the hand toward the top of the frame while the knife is kept in the 45 degree angle to that movement with the wood.  Notice how the shaving is moving not only away from the wood, but also down the blade.

Depth is regulated while the stroke is in motion for best results. The depth can be varied by changing the pitch of the blade; cutting edge turned down to go deeper and cutting edge turned up to go shallow.  As you change the pitch continue to keep the 45 degree angle and only rotate your wrist  slightly either way to accomplish the pitch desired.  This requires some practice but certainly worth it in the end.
3.  This is the follow through of the stroke and it continues past the wood.  The arm should be in control here and you should not be cutting so deep that there is a lunge off  the edge of the object you are carving.  Learn by repetition to keep the wrist rigid and the angles kept in place through the entire stroke.  For proper flow, control and safety your arm must be held close to the body and swing in a pendulum fashion from the shoulder.  The wrist, hand and knife in its set angles moves as a single unit through the wood and follows through. Also notice the finger grip.  Hold the piece between chest and waist height.
4. The same motion is applied to cross grain and shorter cuts. No matter what the length of the cut required, always follow the form mechanics of the stroke taught above.
5.  Here is the classic whittling stroke everyone uses and one that most revert back to, especially when carving smaller pieces of wood.  Even in this stroke you still pull the blade at the 45 degree angle and initiate a slicing motion that removes wood from the hilt to tip instead of from  tip to hilt as shown above in the forward stroke above. Just the opposite from the forward stroke, basically.  The thumb kept below the knife path and against the wood is just extra support for small objects and safety for the thumb.  
DISCLAIMER:
All techniques suggested in this website are attempted at the reader's risk and the writers or webmaster of this site are not responsible for any injuries incurred by any student or reader using the techniques offered herein.
6. Use the same motion as for the forward stroke, only working with the front 1 inch of the blade.  Practice doing this small scoop stroke.  Being on the tip with its narrow width, allows the quick turn up as the tip moves through the stroke. A handy technique for carving around the neck areas of waterfowl and making sharper indents where needed.
7.  The result of this little scoop is a gouge type cut that you can regulate the radius of  by where along the blade you choose to initiate that action.  These are basic carving stokes the beginning wildfowl carver needs to master for carving Tupelo effectively.  Hear the wood sing as you follow through a nice piece of Tupelo with a sharp knife; a joy when done correctly and with the correct tool.
8. When done incorrectly and with the other hand where it is not supposed to be, the result is... 

                                   OUCH! 

Here the hand was held up-stream in the path of the follow through. The result of this bad habit is an injury, either sooner or later. 

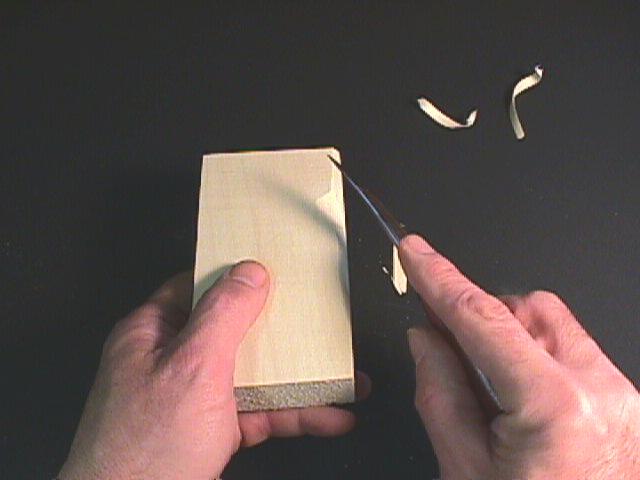
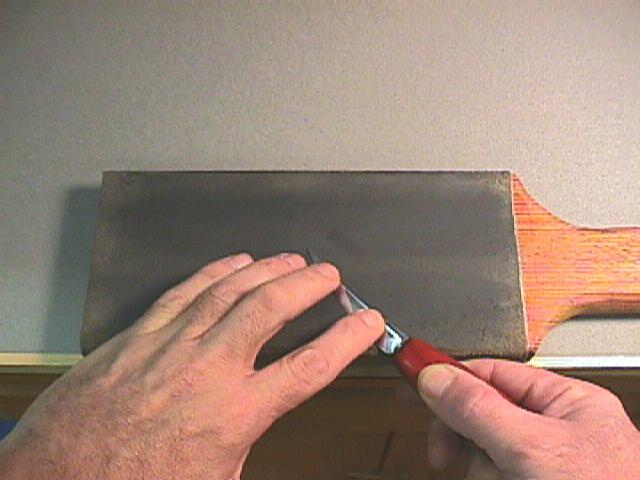
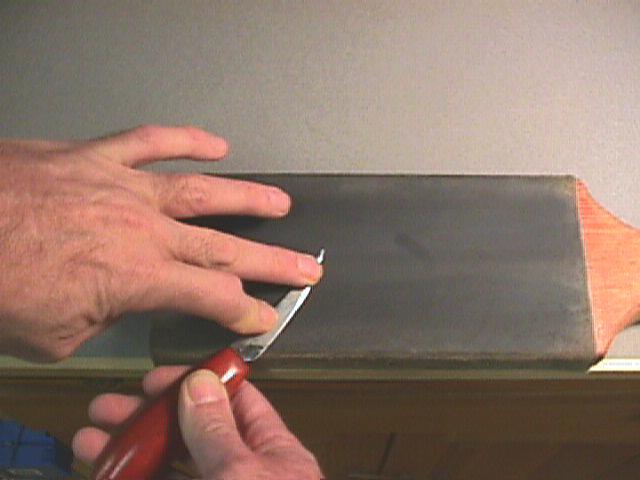
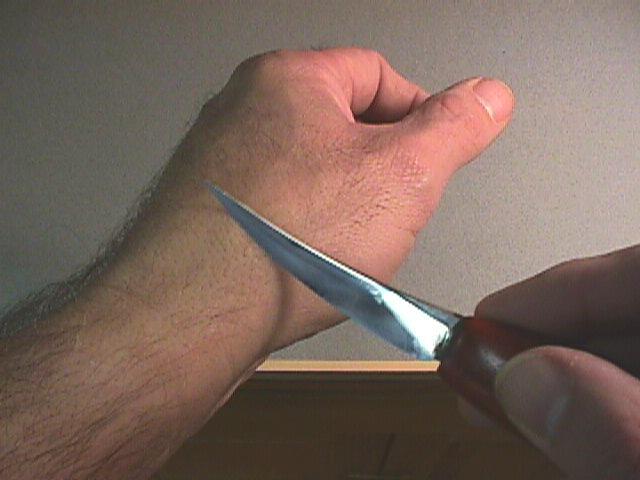
9. Slips will happen and hopefully only minor stabs and cuts.  As you practice good form with the knife and learn the control required, the knife becomes less dangerous in your hands.  Always keep your knife very sharp. When it is sharp you have more control over the blade.  Least resistance, less danger.  Above all, keep your fingers, hands, legs and body out of the path of the intended flow of the cutting edge or point of the blade. 


The author assumes no liablity for your use of any 
techniques offered here or in this website.

Click on Images to Enlarge
How to Strop the Tupelo Knife
The standard  cajun tupelo knife used here will have a 68-72mm long, single bevel blade with a hardwood handle. The blade shape is a special design that puts the cutting power where it should be when sculpting tupelo.  You must NEVER  sharpen this knife on any stone. STROP ONLY and there is a certain  way to do that.  Just follow the stropping instructions here to the letter in order to take the best care of your knife and keep the fine razor edge required for carving tupelo wood.  If you use this knife to carve any other species of wood, you will probably dull the edge so much that you will have to stone it. In stoning this blade it is easy to create a secondary bevel that makes it unsuitable for tupelo carving. A single bevel must be maintained and this stropping technique is the way to do it.. 
Start with the stropping board on the edge of a waist high table and parallel to that table's edge as shown. The strop itself is made with the rough side of a piece of genuine leather  2 part epoxy to a flat hardwood board a minimum of 1/2" thick, 2" wide and about 6" long or more.  Dampen the leather with honing oil and rub into the leather as much Aluminum Oxide powder it will hold.
For the first side, to start the stropping motion, lie the blade completely flat on the strop and at a 45 degree angle. You will be pulling the blade at that angle to the right and then stopping on the leather and lifting straight up, returning to this position again for the next stroke.
Place two fingers of the opposite hand on the blade as shown to hold it firmly to the strop through each stroke. As you pull the knife in this position, tilt the back of the blade up about 12 degrees and hold it at that as best you can through the stroke. Do not let the blade roll at the end of the stroke. That will take the edge off the knife. 
Lock you wrist in that position before pulling the blade to the right as shown here. Also keep your elbows locked close to you body, rotating your whole body like a machine keeping the knife locked in position through the stroke.
After four or five strokes,  then reverse the direction as shown, maintaining the 45 degree angle.
Again apply finger pressure to the blade while pulling the blade through the stroke to the left as shown. 

Be careful with this motion as this is really a back stroke that you may not feel comfortable with. Remember to lock everything in, keeping the angles correct and rotating the body in the direction of the stroke. Four or five strokes to the left on this side should also be sufficient unless you have not stropped in a while. 
Then to test its sharpness, you should be able to dry shave the back of your hand or arm without much resistance. Careful here not to slice, but to pull the blade squarely against the hair flow. If you draw blood, then you have gone too deep :-) yikes!
Return to Beginner Basics
Click on Images to Enlarge
Vic Kirkman Originals Home
Click on Images to Enlarge